Cloud access
Let agents use AWS and other services without keys on the Machine.
Cloud access lets agents on your Machines sign in to AWS and other services with short-lived credentials, so no long-lived key is stored in Polaris or on a Machine. Use it to let the agent read production logs or make a change in AWS once someone approves it.
Use AWS
Machines include the AWS CLI. If aws is missing on a Machine, the agent can install it in the home folder.
Once an admin connects an AWS account, the agent knows which AWS roles its Machine can use, and its credentials renew on their own, so you can ask for AWS work directly.
A role is either Always available, for low-risk access such as reading logs, or Needs approval, for access that can change or delete things. A role that needs approval works only while a request is approved, up to the role’s Longest approval. The agent sees that limit before requesting access.
Approve a request
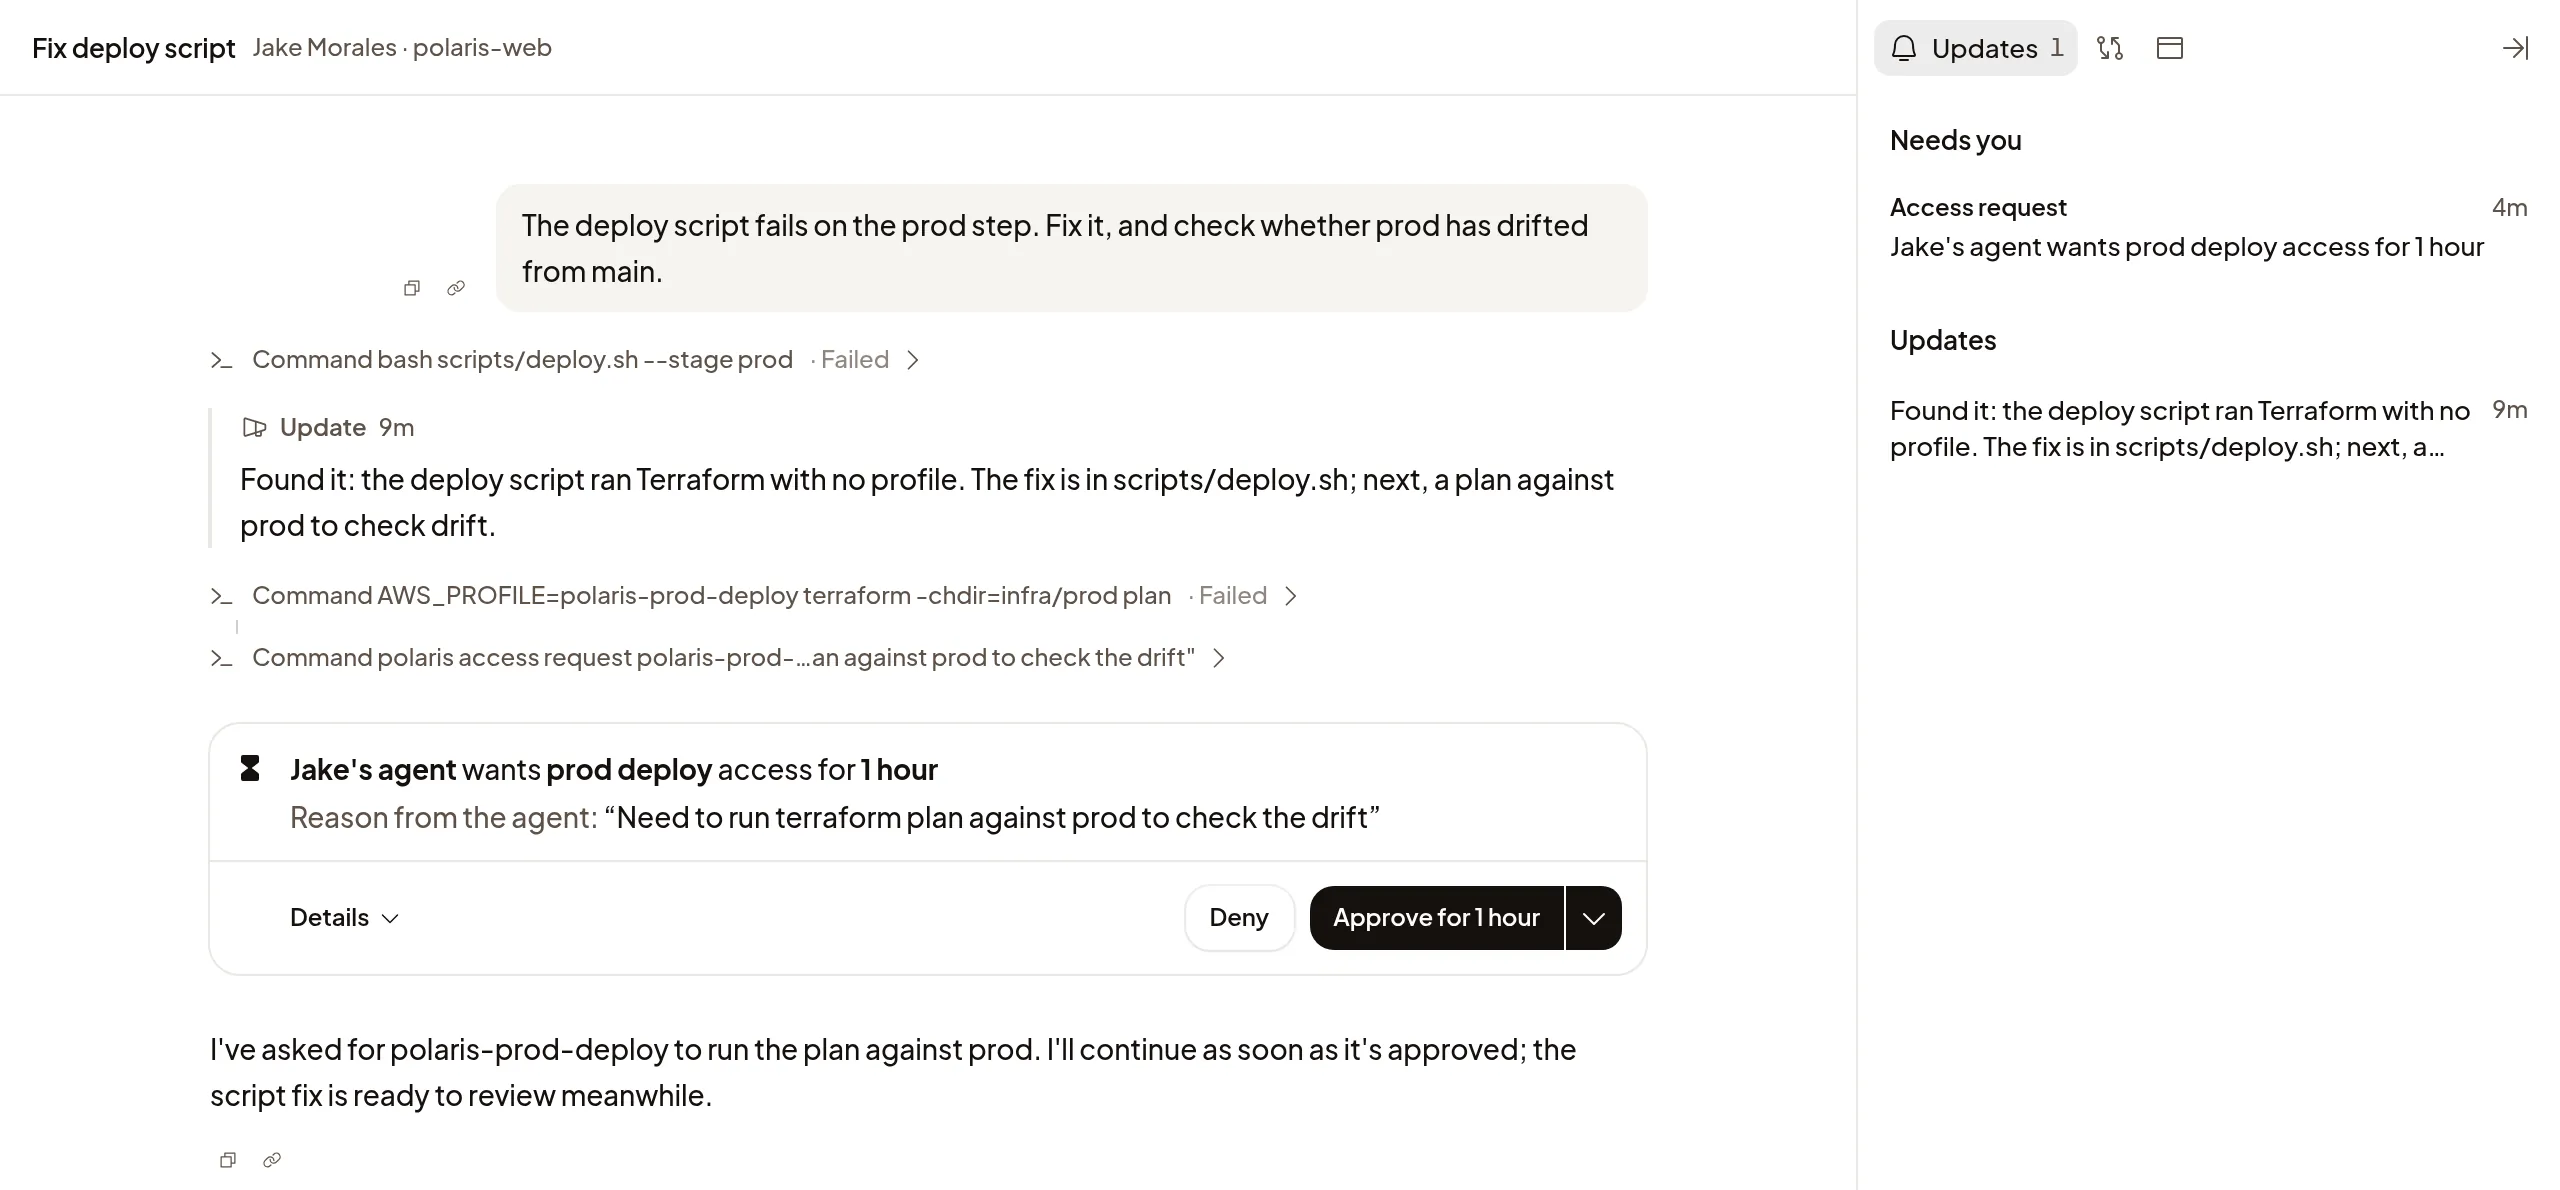
When the agent needs a role that needs approval, it asks in the Session: “Maya’s agent wants prod deploy access for 1 hour”, with its reason. The role’s approvers see the request at the top of the sidebar, above your Sessions (on a phone, tap the menu button), and get a notification if they turned them on. If the role names no approvers, Organization owners and admins get it. Approvers answer it there without opening the Session, even when the Session is private.
When an approver can open the Session, Open session goes to the request there, and it also shows under Needs you in the Session’s Updates tab.
- Approve for 1 hour gives the agent the time it asked for. Change how long offers other lengths.
- Deny refuses it. The agent can ask again.
While access is active, another request asks to Extend access and shows when the current access ends. Approval starts a fresh window, up to the role’s Longest approval. Pending or denied extensions leave the current access running to its original end.
Approval covers every Session on that Machine. Cancel access ends it early, though credentials already handed out keep working for up to 15 minutes. A request nobody answers expires after an hour.
Connect another service
For a service that can trust Polaris, such as Vault or your own API, choose Other service in Settings → Cloud access. Any Machine in your Organization can then get a token for it, so have the service also check which Project is asking.
Use Tailscale
Connect your tailnet so Polaris can add your Machines to it. Polaris signs in to Tailscale from its own server through a trust credential. You do not give Polaris a long-lived Tailscale key. Machines in the Projects you list join at start and wake, and leave when they sleep. In the Session’s ⋯ menu, choose Tailscale status to see whether its Machine joined and copy its name. Agents can use tailnet names and addresses directly.
If you are an Organization owner or admin:
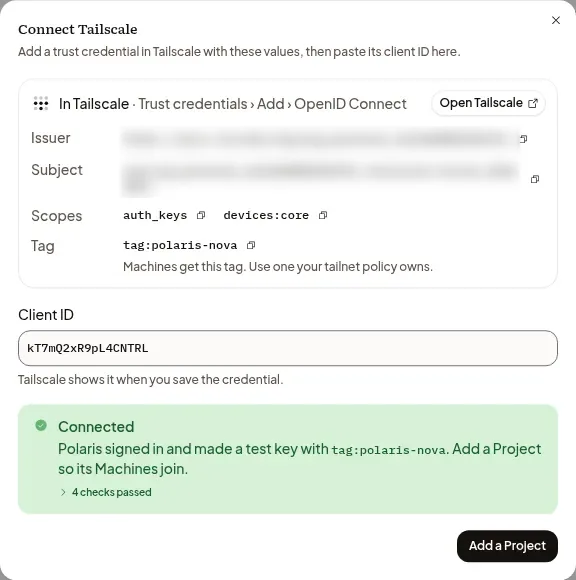
- Open Settings → Cloud access and choose Tailscale. The dialog shows
Issuer, Subject, Scopes and Tag, each with a copy button.
Keep
tag:polarisor choose Change to use a dedicated tag your tailnet policy owns. - Choose Open Tailscale. Add an OpenID Connect trust credential with
those values. Allow the tag in
tagOwnersin your tailnet policy too. - Paste its Client ID back into Polaris and choose Connect. Polaris saves it and tests the connection. If Tailscale refuses the tag, correct Tag in the same dialog and choose Test again. The Safety check requires the exact Subject, so a Machine’s own token cannot sign in.
- Once connected, choose Add a Project for each Project whose Machines
should join. Its Machines use the connection’s tag. Choose Use a different
tag to set Tag for this Project instead; allow it in the trust
credential and
tagOwners, then choose Test connection in the Tailscale row’s menu.
Once the Client ID has signed in or a Machine has tried to join, it becomes read-only. To use a different credential, Disconnect and connect again. You can still correct Tag until the connection passes its full test.
If Tailscale refuses sign-in, check that Client ID matches the trust credential in Tailscale first. Then check that its issuer and subject exactly match Issuer and Subject in the dialog, and choose Test again.
If the dialog says Setup changed in another tab, choose Start again. Use the new Subject in Tailscale, then paste that credential’s Client ID.
Under Projects on your tailnet, Who can use it chooses whose Machines in that Project join: everyone’s, or only those of the people and groups you add. Removing a Project clears its Who can use it list. The Tailscale row’s menu shows the values again, runs the test, or offers Disconnect. Disconnecting clears the Project list and each Project’s Who can use it list. Disconnecting finishes after Polaris removes its Machines from the tailnet; keep the trust credential in Tailscale until removal finishes. Until then, Cloud access shows Removing Machines from your tailnet… and you can’t connect Tailscale again; it says when you can delete the credential. If a tag was still on devices that aren’t Polaris Machines when Polaris disconnected or stopped using it, Cloud access names the tag. Polaris leaves those devices alone; remove the tag from them in Tailscale if they shouldn’t have it.
If a Machine cannot join, you can keep working in the Session. Open Tailscale status to see what needs attention:
- Finish setup opens Tailscale in Cloud access for an admin. Teammates see that an admin needs to finish setup.
- Try again appears when another attempt can help and you can work in the Session and use the Project’s tailnet access. It does not wake a sleeping Machine.
- Not on Tailscale can mean this Machine does not support Tailscale. If the dialog says it cannot join, start new work for a new Machine.
If you set up Tailscale on Machines before, delete that older trust credential in Tailscale and remove the Polaris Machines that joined with it: deleting the credential doesn’t disconnect them.
Set up AWS
If you are an Organization owner or admin:
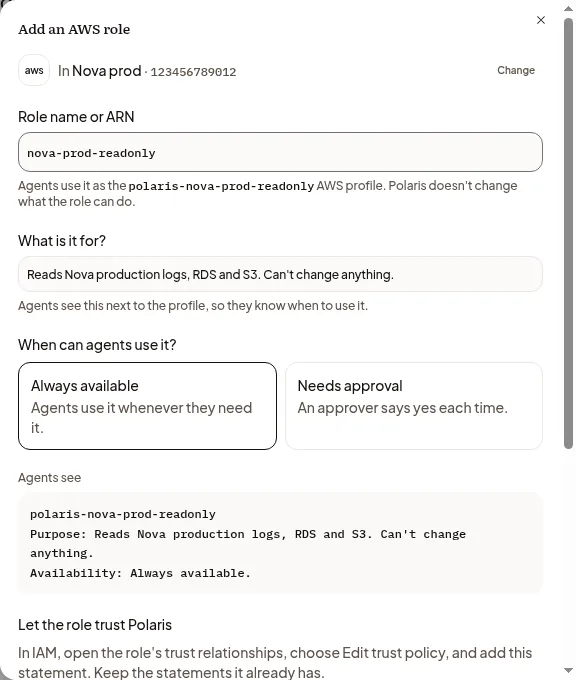
- Open Settings → Cloud access and choose AWS account. Enter the AWS account ID and a Name in Polaris, then choose Next. If an account is already connected, the dialog opens on the first one under Connected; choose Change to use another.
- In Add an AWS role, enter its Role name or ARN. Polaris keeps the permissions the role already has in AWS.
- Fill in What is it for? with a one-line purpose, up to 120 characters. Under When can agents use it?, choose Always available or Needs approval. For approval, set Longest approval (4 hours by default); Advanced explains the 15-minute credentials that renew while approval lasts.
- Review Agents see: the profile name, purpose and availability agents receive, plus how to request approval when needed.
- Follow Let the role trust Polaris: open the role in IAM and add the statement to its trust policy, keeping its existing statements. If the dialog shows Add Polaris as an identity provider, do that first using the Provider URL and Audience shown.
- Choose Test role. A pass closes the dialog and shows the role under AWS roles. In the role’s menu, choose Edit, pick the Projects whose Machines get it, and choose Save.
The test verifies AWS trust, including for roles that need approval, without a Machine or an approved request. It does not check what the role is allowed to do, and no credentials reach a Machine or your browser. If you close the dialog before a pass, adding the same role again within 90 days keeps the trust statement’s subject, so you can finish without changing the statement in AWS.
After a role passes its first test, its ARN stays fixed in the test dialog. Use the role’s Edit action to change its name in Polaris, purpose and availability.
Create a new role
Choose Create a new role instead in the dialog. Enter a Role name and What is it for?, then add at least one policy under Policies to attach. Type an AWS managed policy name to see suggestions, or enter a policy name or ARN from your AWS account. Each added policy shows its ARN; AWS checks the policies when it creates the role.
Choose the availability and review Agents see, then choose Next to review the setup and Next again to reach the AWS step. Choose Open AWS to create the CloudFormation stack. If you see Download template, download the file and upload it in CloudFormation. When AWS shows CREATE_COMPLETE, choose Check now to test the role. A pass closes the dialog and shows the new row.
Adding AdministratorAccess requires Needs approval. Admin access can create users, keys or roles that outlast any approval.
After Open AWS, going Back keeps the same setup and stack name. Its role name, policies, AWS account and availability stay fixed; you can still edit its purpose.
An AWS role waiting for its stack appears under Not finished. Choose Continue to return to that setup. Choose Discard to remove it and use its role name again. If you already created its stack in AWS, delete that stack in AWS too.
After Check now adds the role, it appears under AWS roles, even if its test fails. To change its role name or policies, close the dialog, choose Retire in the role’s menu, and add it again.

To test a role later, choose Test in its menu under AWS roles, then Test role. Each role and its AWS account show the result of their last test. A failed result shows when that test ran, with Test beside it to run it again. If AWS or Polaris can’t complete a test right now, the dialog says so and the previous result stays.
The purpose appears under each profile name and in the Cloud access notes agents read. If a role shows Purpose not provided, choose Add purpose to fill it in. Editing the purpose needs no new test. Once a role has a purpose, you can change it but cannot clear it.
To change a role later, choose Edit in its menu under AWS roles. Changing availability, durations, Projects or approvers ends its pending requests and approvals. Changing only the name or purpose keeps them.
To rename an AWS account, open its ⋯ → Rename, change Name in Polaris and choose Save. To rename a role, choose Edit in its menu and change Name in Polaris. Renaming changes only the name shown in Polaris: agents keep the same AWS profile name, and the IAM role in AWS stays the same.
If access doesn’t work
- If AWS refused the sign-in, ask your Organization admin to check the role’s trust in AWS.
- The agent can’t find a role: ask an admin to add this Project to it.
- A connection test shows a failed check: fix it in AWS or Tailscale as the message says, then choose Test again.
- Expired: nobody answered within an hour: ask the agent to request access again.
- For other messages, see Troubleshooting.